A ready-made lesson plan: Unleash children’s curiosity and get ready for some paper helicopter fun!

Tired of the same old experiments? Looking for a new and exciting way to engage your students in hands-on ways? Look no further…
In this blog, we'll explore the fascinating world of paper helicopters; yes, that’s right, helicopters made from paper. No we haven’t eaten too many Curly Wurly’s from the stash in HCS HQ, you’re about to discover why they’re perfect for classroom experiments and for unleashing curiosity - and for a ready-made lesson plan. Hurrah!
So grab some paper, scissors, and paper clips and prepare to take flight.
The magic of paper helicopters
While many children can easily fold a paper plane, paper helicopters offer a whole new level of excitement and experimentation. And the more your pupils use curiosity, not only to learn but also to discover how failure improves their understanding of new things, the better.
Here’s how to make one:
To begin using an A4 piece of paper, follow these simple steps:
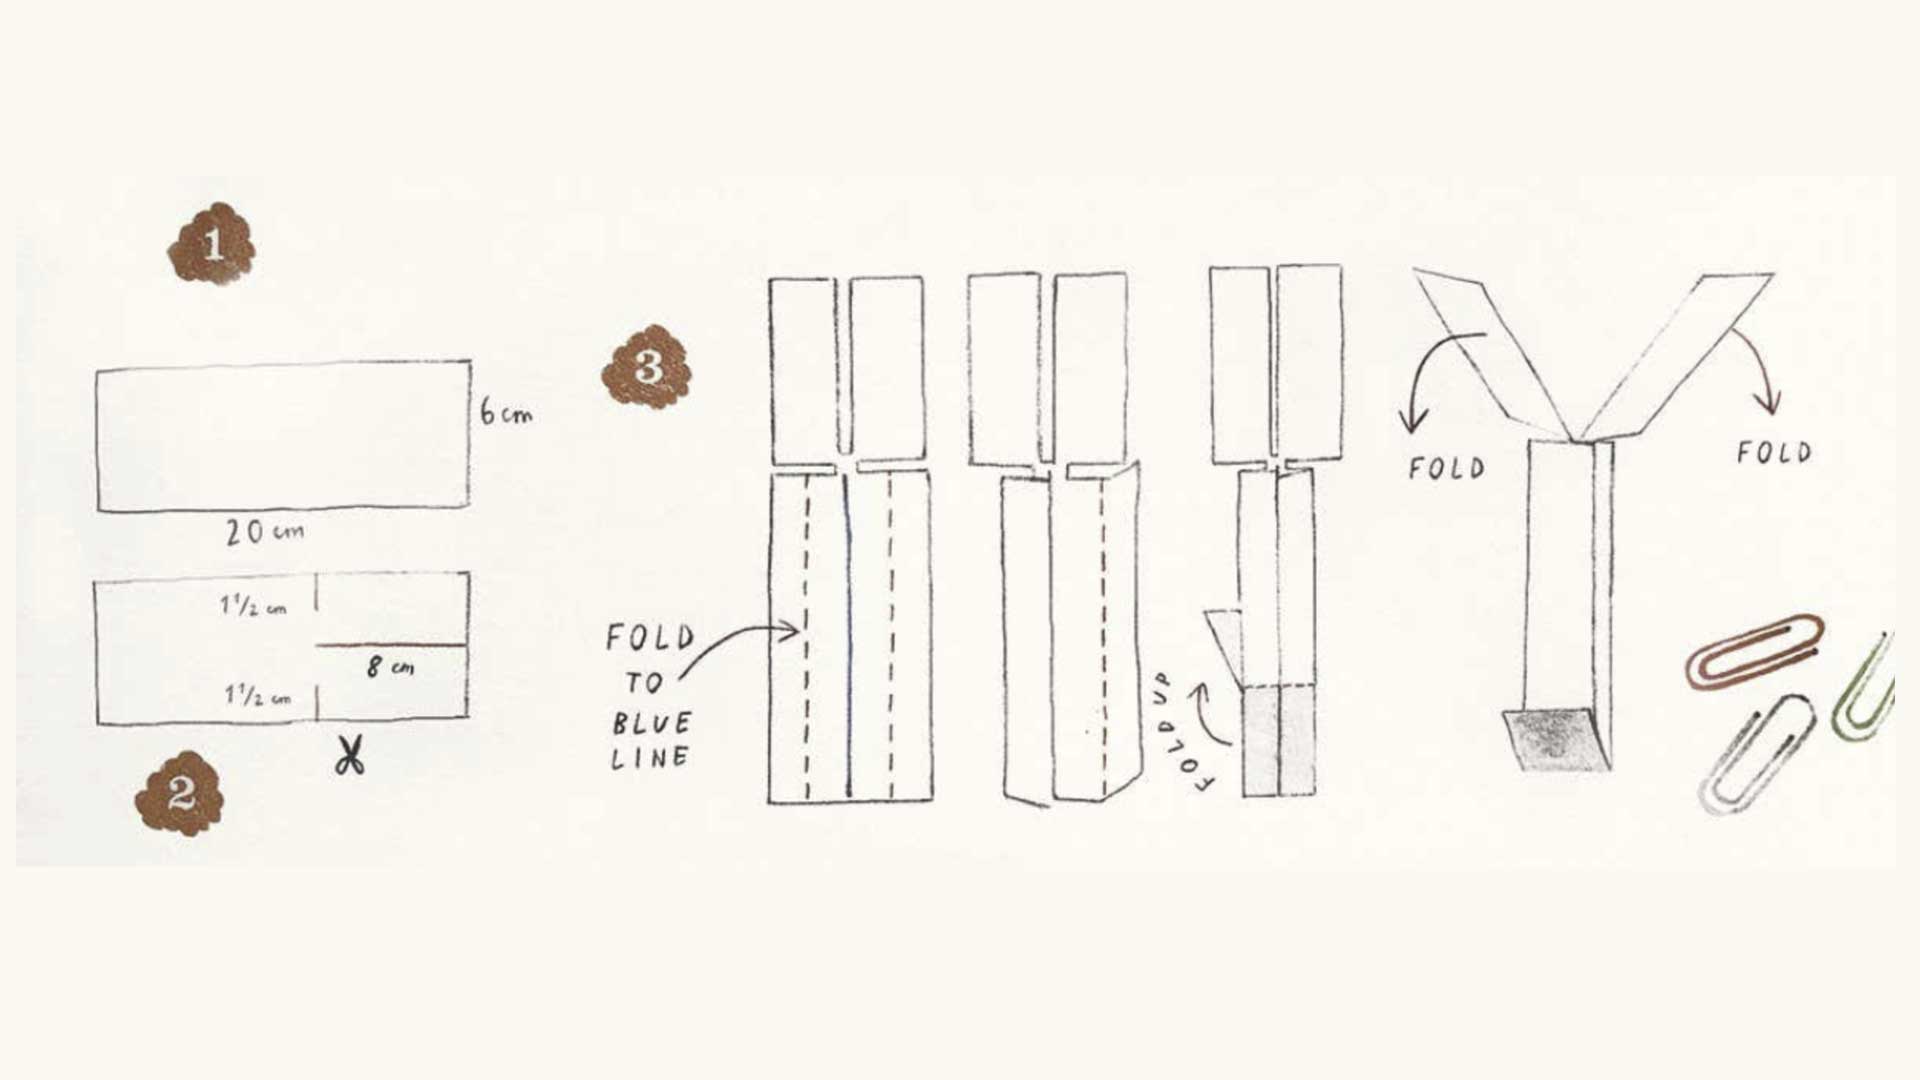
- Cut the paper into a rectangular strip, approximately 6cm wide and 20cm long.
- Make three strategic cuts in the paper, as shown by the red lines in diagram 2 (see diagram).
- Now, fold the paper along the dotted lines indicated in Diagram 3 (see above). For added stability, you can attach a paper clip to hold the bottom flap closed.
- Bend the "blades" in opposite directions, as depicted in the final image.
- Hold your magnificent paper helicopter by its stem and get ready for takeoff!

Now explore the fascinating science behind paper helicopters
The first thing that surprises most people when using their paper helicopter is its self-spinning motion. Get the conversation started by asking your class questions on how they think this happens. Then unravel the science together.
When you release the helicopter, air rushes into the folds where the blades meet the stem. The helicopter's asymmetrical design, with each blade attached to half the stem on opposite sides, creates something called a "couple." Air pushes each side of the stem in opposing directions but along parallel lines, resulting in rotational motion.
Imagine spinning a coin on its edge by applying equal force on both sides. The same idea applies to the rotating stem of the paper helicopter. As the helicopter falls, the blades are pushed upward by the air, causing them to tilt.
This tilt creates a lift force similar to the force you experience when you stick your hand out of a moving car window at an angle. This opposing force reduces the effect of gravity on the helicopter, making it fall more slowly than if it were not spinning.
Bet you didn’t think we could get our science hats on, but we’ve got more up our sleeves than just happiness!
Other exciting experiments to try
Now that you understand the science behind paper helicopters, it's time to unleash your inner scientist and conduct some other experiments.
Here are a few ideas to get you started:
- Attach one or more paper clips to the bottom of your helicopter. Observe how it affects the speed of rotation and descent. Why do you think this happens?
- Can you make your helicopter spin in the opposite direction? Explore different modifications to achieve this mesmerising effect.
- Experiment with different folding techniques or blade shapes to alter the helicopter's falling speed. Can you make it descend faster or slower?
- What else could you try, and what might it achieve?
Unleash your curiosity
With just a sheet of paper and some imagination, you can encourage creativity and curiosity in your classroom - and a lot of fun and laughter. These helicopters not only provide endless entertainment but also offer valuable lessons in physics and aerodynamics.
So gather your materials, invite your students to join the adventure, and let the paper helicopters take flight!
For more free stuff to use in the classroom, head to our Resources page.


